
SO LET'S START OUR TALK
CREATE A CUSTOM TAXONOMY
In WordPress, you can create (or “register”) a new taxonomy by using the register_taxonomy() function. Each taxonomy option is documented in detail in the WordPress Codex.
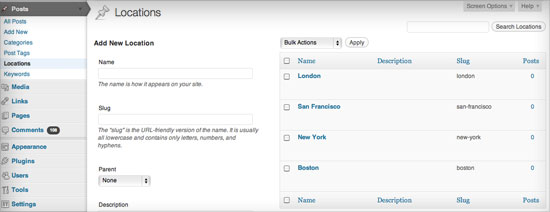
After adding this to your theme’s functions.php file, you should see a new taxonomy under the “Posts” menu in the admin sidebar. It works just like categories but is separate and independent.

After adding a few terms to your new taxonomy, you can begin to organize the content in your posts by location. A new “Locations” box will appear to the right of your posts in the WordPress admin area. Use this the way you would categories.
Let’s use this “location” taxonomy as a jumping-off point to learn more about working with taxonomy functions and content.
CREATE A TAXONOMY TEMPLATE FOR YOUR THEME
When you add a custom taxonomy to a WordPress theme, you can display its content using one of WordPress’ taxonomy theme templates.
taxonomy-{taxonomy}-{slug}.phpWe could use this to create a theme template for a particular location, such astaxonomy-location-boston.phpfor the term “boston.”taxonomy-{taxonomy}.phpIf the taxonomy werelocation, WordPress would look fortaxonomy-location.php.taxonomy.phpThis template is used for all custom taxonomies.archive.phpIf no taxonomy-specific template is found, then the taxonomy that lists pages will use the archive template.index.phpIf no other template is found, then this will be used.
Let’s use taxonomy-location.php to display our content. The template file could look something like this:
(Normally, we would load a template part for the loop, but for the sake of simplicity, I’ve skipped that step. As an alternative to get_term_by(), we could use single_term_title() and term_description() on this taxonomy archive template to display or retrieve the title and description of the taxonomy term.)
In this example, we’ve used a function called get_term_by() to retrieve all of the data associated with a taxonomy term in the form of an object. The object returned by the get_term_by() function contains the following details about the term:
ID325nameBostonslugbostongroup0taxonomylocationtaxonomy ID325descriptionIf you need to know the latest news in Boston, then look no further.parent0 (or the ID)count1 (i.e. the number of posts with this term selected)
We’ve used this object, then, to display information about the current term name and description in the taxonomy-location.php template.
USING TAXONOMY CONDITIONALS
Conditional tags can be used in WordPress to determine what content is displayed on a particular page depending on the conditions met by the page. Taxonomy templates have their own set of conditionals:
is_tax()When any taxonomy archive page is being displayed.is_tax( 'location' )When a taxonomy archive page for the “location” taxonomy is being displayed.is_tax( 'location', 'boston')When the archive page for the “location” taxonomy with the slug of “boston” is being displayed.is_tax( 'location', array( 'boston', 'new-york', 'philadelphia' ) )Returnstruewhen the “location” taxonomy archive being displayed has a slug of either “boston,” “new-york” or “philadelphia.”taxonomy_exists()When a particular taxonomy is registered viaregister_taxonomy().
Working With Taxonomy Functions
DISPLAY A LIST OF TAXONOMY TERMS
Most navigation systems begin with an unordered list. You can generate an unordered list of links to taxonomy archive pages using the wp_list_categories() function. This function is very customizable and can handle most of the scenarios that you’ll encounter as a theme developer.
If you encounter a situation that requires a custom structure, I would recommend exploring the Walker class or the wp_get_object_terms() function.
CREATE A TAXONOMY TAG CLOUD
A tag cloud provides a great way for users to browse content. The wp_tag_cloud() function makes creating a tag cloud with a custom taxonomy easy.
Let’s use it to display a tag cloud of our location terms:
GET ALL TERMS IN A TAXONOMY
You will often need to work with a full list of terms in a taxonomy, and the get_terms() function can be quite handy for this. Let’s use it to show off the number of locations to which we’re providing news:
This will output the following HTML:
This simple approach may not show it, but the get_terms() function is incredibly powerful. It allows you to get terms from multiple taxonomies at once by passing an array that contains the names of your taxonomies as the first parameter.
WORKING WITH WP_QUERY AND TAX_QUERY
The WP_Query class enables you to create a custom loop. WordPress 3.1 introduced a new parameter for the class called tax_query, which allows you to display content from a taxonomy in many unique ways.
Let’s use it to create a list of the most recent news posts in Boston.
We could easily make this set-up dynamic by using the get_term_by() or get_terms() functions that we discussed earlier.
Attaching Additional Data To A Taxonomy
Each taxonomy term has specific data associated with it. Out of the box, WordPress allows you to store the following information for each taxonomy term:
- Name,
- Slug,
- Parent,
- Description.
But what if you need to store more information, such as an image for the taxonomy term or a title and description for search engines, or maybe even attach the term to a particular author the way a traditional news column does? Since WordPress 2.9, developers have been able to attach additional meta data to posts, pages, custom post types, comments and users using the add_metadata(), update_metadata() and get_metadata() functions. But this does not include taxonomies such as tags and categories.
With the help of the Taxonomy Metadata plugin, we can attach meta data to taxonomy terms for both built-in and custom taxonomies. This enables us to create additional taxonomy fields that will be stored in a new taxonomymeta database table.
Note to Multisite developers: I’ve encountered issues using the Taxonomy Metadata plugin on a WordPress Multisite installation. Activating the plugin network-wide results in data not being saved. Instead, activate the plugin individually for each website, and it will work properly.
(Knowing the story behind this technique and what it might mean for future WordPress upgrades is important. Currently, there is a debate on the WordPress Trac project about the best method for this. The method I’ll show you is one suggested by various WordPress core developers. But I strongly urge you to review the Trac project and the Codex. A standard approach could very well be built into WordPress in the future, which would therefore be more practical than what I am about to show you.)
The prerequisite to all of the examples below is to install and activate the Taxonomy Metadata plugin.
ADD SEARCH ENGINE TITLE AND DESCRIPTION FIELDS TO CATEGORIES AND TAGS
We will use action hooks to gracefully attach additional fields to our taxonomies without editing WordPress’ core. If you’ve made it this far, then you probably have a working knowledge of WordPress filters and actions. To learn about working with hooks, I highly suggest Daniel Pataki’s article on the subject.

Let’s start by adding a text input and a textarea field to the “Add New” and “Edit” term pages on the WordPress admin screen. We do this by placing the following functions in our theme or plugin.
The taxonomy_metadata_add() function attaches the fields to the /wp-admin/edit-tags.php?taxonomy=%taxonomy% page. The %taxonomy% item in the URL above will change depending on the term you are editing.
The taxonomy_metadata_edit() function attaches the fields to the /wp-admin/edit-tags.php?action=edit&taxonomy=%taxonomy%&tag_ID=%id%&post_type=%post_type% page. The %taxonomy%, %id% and %post_type% items in the URL above will change depending on the term you are editing.
We’ll use the get_metadata function here to display any saved data that exists in the form.
These two functions control the output of the form fields. I’ve used HTML that follows WordPress’ UI patterns and styles guidelines for the admin area.
Saving the form’s data to the taxonomymeta database table Now that we’ve added the form fields, we’ll need to process and save the data with the update_term_meta function that is provided by the plugin.
Add the new taxonomy fields Now that everything is in place, we’ll use action hooks to load our new functions in all the right places. By hooking the following function into the admin_init action, we ensure that it runs only on the admin side of WordPress. First, we need to make sure that the functions added by the Taxonomy Metadata plugin are available. Next, we use the get_taxonomies() function to attach the new taxonomy fields to every public taxonomy, including the built-in tags and categories.
That’s it. We’re done!
You should now see two additional fields in your tags, categories and public custom taxonomies. As mentioned at the beginning of this section, the technique can be used to handle many different scenarios. This basic framework for storing and retrieving information associated with a taxonomy should have you well on your way to mastering the management of taxonomy content.
In Conclusion
I hope you better understand how to organize WordPress content with the help of taxonomies. Whether hierarchal or multifaceted, a well-implemented taxonomy will simplify the way content is organized and displayed on a website. WordPress has all of the tools you need to create custom taxonomies and to group your content in new and exciting ways. How you use them is up to you!